CI/CD in Github with Github Actions

I have been playing around with workflows in Github actions for some time and decided to share my experience and a workflow I have setup that builds on a few key steps that I like to use.
I will show you four useful steps to have in your workflow and how to construct your workflow.yml file to service these areas:
- Lint
- Validate
- Preview
- Deploy
But first we have some pre-requisites to handle.
Setup a service principal in Azure AD
We will use a service principal (SP) to authenticate and authorise ourselves to sign in to Azure & complete deployments.
You will need permissions to create an Azure AD application to complete the following set of commands:
githubOrganizationName='myGithubUserAccount'
githubRepositoryName='nameOfRepositoryInGithub'
The above creates some variables to be used later. Now we want to actually create the SP and associate it with our Github repository.
applicationRegistrationDetails=$(az ad app create --display-name 'name-of-your-sp')

applicationRegistrationObjectId=$(echo $applicationRegistrationDetails | jq -r '.id')

applicationRegistrationAppId=$(echo $applicationRegistrationDetails | jq -r '.appId')
The first command creates the SP and stores all of the information in a variable called $applicationRegistrationDetails, we use the information in this variable to store the objectID and application ID in two more variables. We will use this information to create some federated credentials. Next we create the federated credential:
az ad app federated-credential create \
   --id $applicationRegistrationObjectId \
   --parameters "{\"name\":\"name-of-workflow-branch\",\"issuer\":\"https://token.actions.githubusercontent.com\",\"subject\":\"repo:${githubOrganizationName}/${githubRepositoryName}:ref:refs/heads/main\",\"audiences\":[\"api://AzureADTokenExchange\"]}"

az ad app federated-credential create \
   --id $applicationRegistrationObjectId \
   --parameters "{\"name\":\"name-of-workflow-env\",\"issuer\":\"https://token.actions.githubusercontent.com\",\"subject\":\"repo:${githubOrganizationName}/${githubRepositoryName}:environment:Website\",\"audiences\":[\"api://AzureADTokenExchange\"]}"
We actually created two federated credentials here, its required for later steps.
It is great using a federated credential instead of a regular secret that is shared with another party or application to gain access. With federated credentials we can configure an Azure AD managed identity or an identity from an external OpenID Connect Provider to get tokens as this SP and access Azure resources. The federated credential scenario in this use uses Github Actions deploying Azure Resources scenario and works only with our repository that we specified. We will also lock down this SP on the Azure side using RBAC.
Following this we will create a resource-group that will host our deployed resources:
resourceGroupResourceId=$(az group create --name githubActionsTest --location westeurope --query id --output tsv)

az ad sp create --id $applicationRegistrationObjectId
az role assignment create \
   --assignee $applicationRegistrationAppId \
   --role Contributor \
   --scope $resourceGroupResourceId
In this example we give our SP Contributor access over the created resource-group. You should always consider least privilege and only allow whatever role is required to complete the job. In this case it is a demo and all of these resources will be destroyed when we are finished.
Prepare Github secrets
Enter the following commands in your terminal to output some information that we will use for creating Github Secrets:
echo "AZURE_CLIENT_ID: $applicationRegistrationAppId"

echo "AZURE_TENANT_ID: $(az account show --query tenantId --output tsv)"

echo "AZURE_SUBSCRIPTION_ID: $(az account show --query id --output tsv)"
Note, make sure that `az account show` displays the correct account & subscription for your environment.
In your Github Repo go to Settings & under Security select Secrets and Variables, then Actions.
Here you want to select New repository secret & create three secrets using the outputs you received from the above commands in your terminal. Your finished configuration should look similar to this:
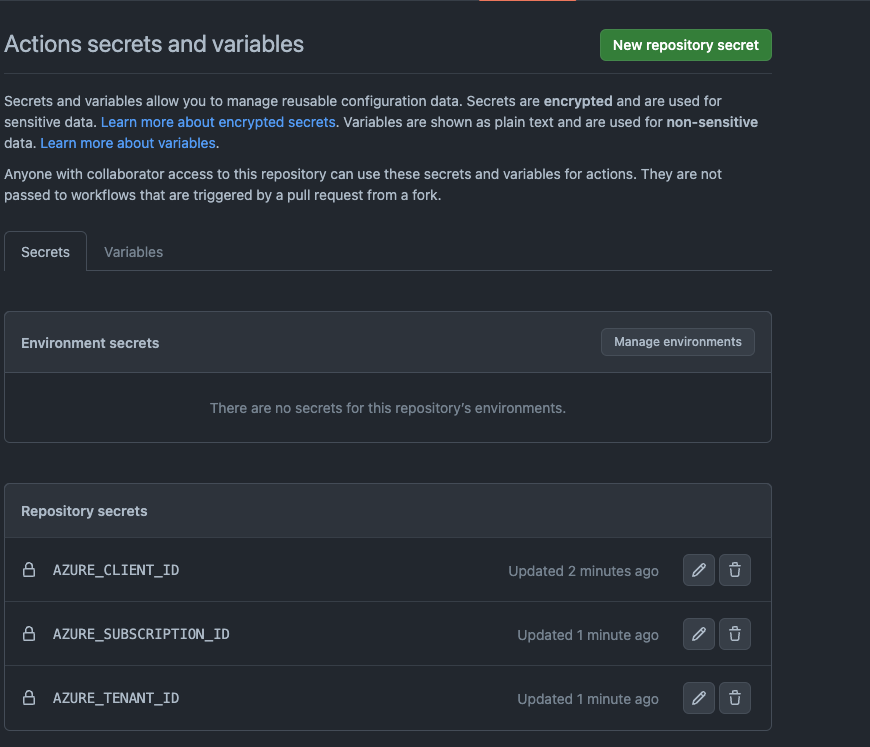
The content is the specific ID of the item.
Setting up automatic testing of your deployments
There are many ways you can handle this, not all actions require all the steps I will show here but this is a very secure way of verifying and gaining confidence in your deployments.
First off we have some housekeeping to take care of for the first step we will have which is the linter. A linter checks your code for common errors and ensures you are following best practices like no secrets in plain-text in your code or unused variables. In the same folder that you have your main.bicep file you can create a file called bicepconfig.json
{
  "analyzers": {
    "core": {
      "enabled": true,
      "verbose": true,
      "rules": {
        "adminusername-should-not-be-literal": {
          "level": "error"
        },
        "max-outputs": {
          "level": "error"
        },
        "max-params": {
          "level": "error"
        },
        "max-resources": {
          "level": "error"
        },
        "max-variables": {
          "level": "error"
        },
        "no-hardcoded-env-urls": {
          "level": "error"
        },
        "no-unnecessary-dependson": {
          "level": "error"
        },
        "no-unused-params": {
          "level": "error"
        },
        "no-unused-vars": {
          "level": "error"
        },
        "outputs-should-not-contain-secrets": {
          "level": "error"
        },
        "prefer-interpolation": {
          "level": "error"
        },
        "secure-parameter-default": {
          "level": "error"
        },
        "simplify-interpolation": {
          "level": "error"
        },
        "use-protectedsettings-for-commandtoexecute-secrets": {
          "level": "error"
        },
        "use-stable-vm-image": {
          "level": "error"
        }
      }
    }
  }
}
Once this is created you can create your workflow file here /.github/workflows/workflow.yml
name: deploy-website

on:
  push:
    branches:
      - main

permissions:
  id-token: write
  contents: read

env:
  AZURE_RESOURCEGROUP_NAME: githubActionsTest

jobs:
  lint:
    runs-on: ubuntu-latest
    steps:
    - uses: actions/checkout@v3
    - name: Run Bicep linter
      run: az bicep build --file deploy/main.bicep
A note is that workflow files are incredibly picky with their syntax and indentation, I use an extension in VS code to help me a lot. Next is that we want to add the following code to this to run the next job at the same time which is the validate.
Validate is a little bit different and performs what is called the pre-flight check and scans your code for specific errors. It can be easy things like illegal characters in a keyvault or storage account resource. Here we will actually use our created secrets as well to sign in to our Azure Environment.
validate:
    runs-on: ubuntu-latest
    steps:
    - uses: actions/checkout@v3
    - uses: azure/login@v1
      name: Sign in to Azure
      with:
        client-id: ${{ secrets.AZURE_CLIENT_ID }}
        tenant-id: ${{ secrets.AZURE_TENANT_ID }}
        subscription-id: ${{ secrets.AZURE_SUBSCRIPTION_ID }}
    - uses: azure/arm-deploy@v1
      name: Run preflight validation
      with:
        deploymentName: ${{ github.run_number }}
        resourceGroupName: ${{ env.AZURE_RESOURCEGROUP_NAME }}
        template: ./deploy/main.bicep
        parameters: deploy/params.json
        deploymentMode: Validate
deploymentMode: Validate here is crucial.
Now that we have both linted and validated our code we can feel pretty confident going into the next stage. Of course even if your code is "correct" you still may have undesired affects, maybe you configured something wrong or in a way that you did not intend, maybe you forgot to change the SKU of your app service plan for example.
Whenever I do deployments I will always run a what-if before applying, like a terraform plan or a -WhatIf in Powershell. Would it not be wonderful if all or co-workers that work in the same codebase also did this? Well, we can force them to.
Add the following to your workflow.yml file
preview:
    runs-on: ubuntu-latest
    needs: [lint, validate]
    steps:
      - uses: actions/checkout@v3
      - uses: azure/login@v1
        name: Sign into azure
        with:
          client-id: ${{ secrets.AZURE_CLIENT_ID }}
          tenant-id: ${{ secrets.AZURE_TENANT_ID }}
          subscription-id: ${{ secrets.AZURE_SUBSCRIPTION_ID }}
      - uses: azure/arm-deploy@v1
        name: Run what-if
        with:
          failOnStdErr: false
          resourceGroupName: ${{ env.AZURE_RESOURCEGROUP_NAME }}
          template: deploy/main.bicep
          parameters: deploy/prod-params.json
          additionalArguments: --what-if
Notice this has needs: [lint, validate] specified which means that this job will not run unless lint & validate has a successful run, which is what we want, and additionalArguments: --what-if is important here.
Set up an environment
We can configure an extra step in our workflow that will require one or more reviewers to check that output from our what-if that we will soon create, to add an extra layer of quality control. In your github repository create a new environment and check the box for required reviewers, like I have here:
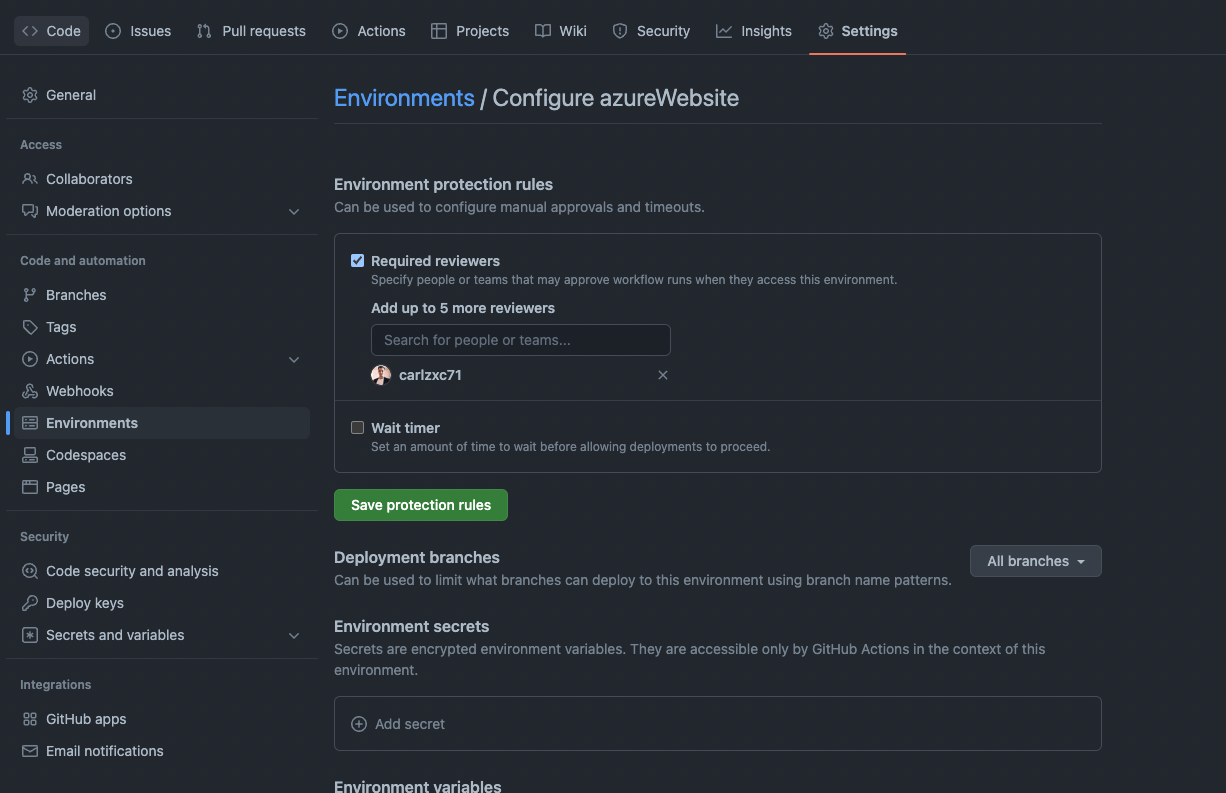
Here I have added myself as a required reviewer but in a team you would specify more people. This means that as our action runs and if previous jobs are successful we will need to approve the preview to get to the next step which will be deploy.
To configure this last step in the workflow file add the following to your workflow.yml
deploy:
    runs-on: ubuntu-latest
    environment: azureWebsite
    needs: preview
    steps:
      - uses: actions/checkout@v3
      - uses: azure/login@v1
        name: Sign in to azure
        with:
          client-id: ${{ secrets.AZURE_CLIENT_ID }}
          tenant-id: ${{ secrets.AZURE_TENANT_ID }}
          subscription-id: ${{ secrets.AZURE_SUBSCRIPTION_ID }}
      - uses: azure/arm-deploy@v1
        name: Deploy website
        with:
          failOnStdError: false
          deploymentName: ${{ github.run_number }}
          resourceGroupName: ${{ env.AZURE_RESOURCEGROUP_NAME }}
          template: deploy/main.bicep
          paramaters: deploy/prod-params.json
On line 3 we reference the environment we created, this is critical for this step. You can also see that we require the job preview to finish successfully and be approved for us to get to this step.
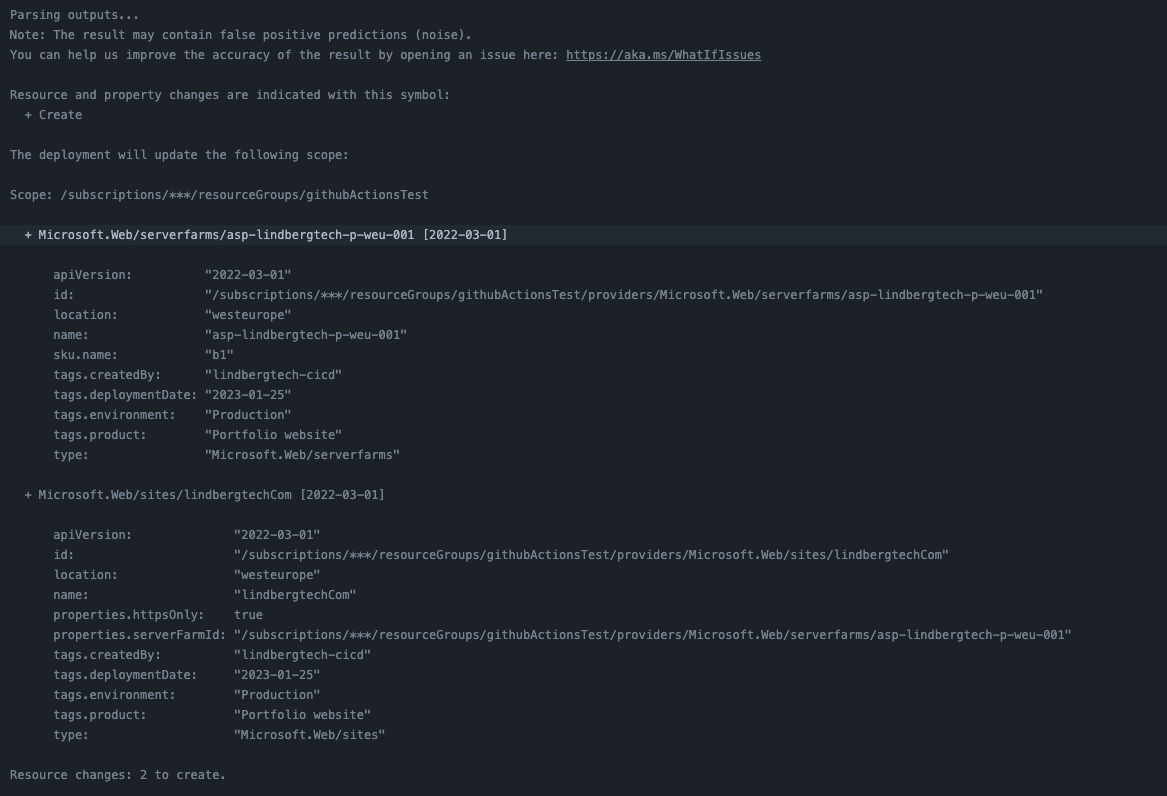
When preview finishes we can see the what-if output in this Github Actions step:
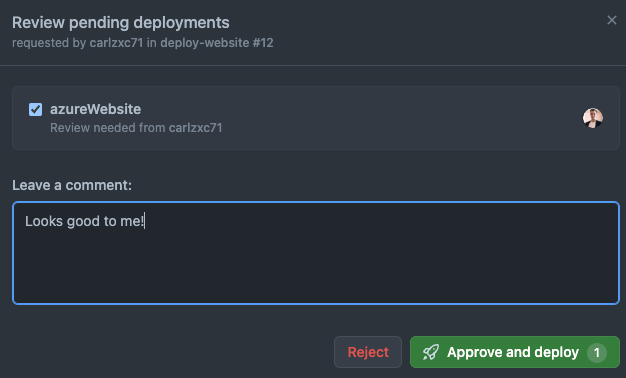
I will need to accept these changes before the workflow continues, if I think it looks good:
It will start to deploy:

I now have a successful deployment connected to the github run ID so we can track back to which action created the deployment.

References & notes
Huge thanks to Microsoft Learn for great modules on this which is where I learned how to configure this. I will leave a link to them here for you to take a look if you wish to do a more in-depth deep-dive here:


In this example and in the project you build using the learn modules you require an approval from the preview-job that outputs the what-if information for you on the screen. Some people may think this is an unnecessary step since we still protect our main branch with pull requests that someone else has to review.
I agree that it can perhaps be too much granularity, but I also feel like only the technician that worked on the code can really tell 100% if the what-if actually is okay. The technician reviewing the pull request may scan more for if the code follows best practices and if the code looks good overall for the project, but he may not know what subnet a VNET should have for example.
Do with those thoughts and discuss with your team as you please. If you feel like it is too much and adds more work than you would like then you can simply remove the environment part and not require that extra approval-step. You can still keep the job in Github Actions for reference and troubleshooting.
Thank you for your time today!
About the author
